


Use this guide if you are an admin who needs to set up FineBI Cloud for your organization. You will configure members, product access, roles, spaces, data sources, shared data assets, and data portals.
Before You Start
Make sure you are an organization admin. If FineBI Cloud is installed through a third-party app platform, for example, Lark, members must be added and managed in that platform, and FineBI Cloud does not support direct member invitations in this setup.
Admin Setup Path
| Task | Result |
|---|---|
| Choose a management model | Decide whether members and data are managed by business admins or by a centralized IT/admin team. |
| Manage members | Add members to the organization and make them available in FineBI Cloud. |
| Assign roles | Set who can create analysis content and who can only view published content. |
| Set up spaces | Create spaces and add space members, or allow authorized editors to create spaces based on your management model. |
| Configure shared data access | Connect shared data sources, prepare reusable data assets, and grant data permissions when data is managed centrally. |
| Configure data portals | Provide a centralized entry for viewers to access tables, dashboards, and storyboards. |
Choose a Management Model
FineBI Cloud supports different administration patterns. Choose the one that matches how your organization manages members, data, and analysis ownership.
The tables below describe responsibility ownership, not a required step-by-step workflow for admins.
Use this model when business teams manage most day-to-day analysis work themselves.
| Role | Typical Responsibilities |
|---|---|
| Project owner or coordinator | Manages members, assigns Editor or Viewer roles, and configures sub-admin permissions when needed. |
| Business analyst | Creates spaces, uploads Excel data or connects data sources, prepares data, creates charts, and builds dashboards or storyboards. |
| Business user or leadership | Views dashboards and storyboards shared with them in Portal. |
Manage Members
Members must be added to your organization before they can use FineBI Cloud.
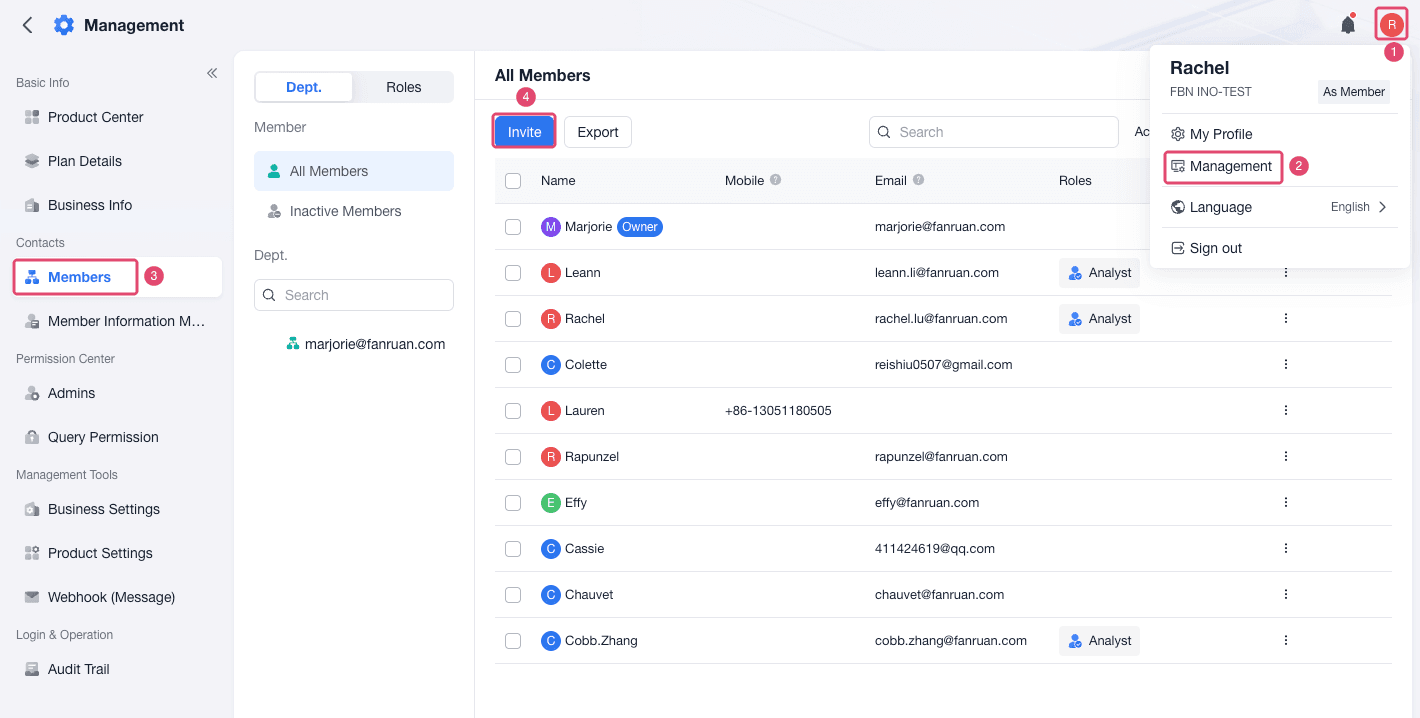
Invite members under Management Backend > Members.
You can add members manually, import members in bulk using Excel files, or share an invitation link when self-service joining is allowed.
Set FineBI Cloud Access
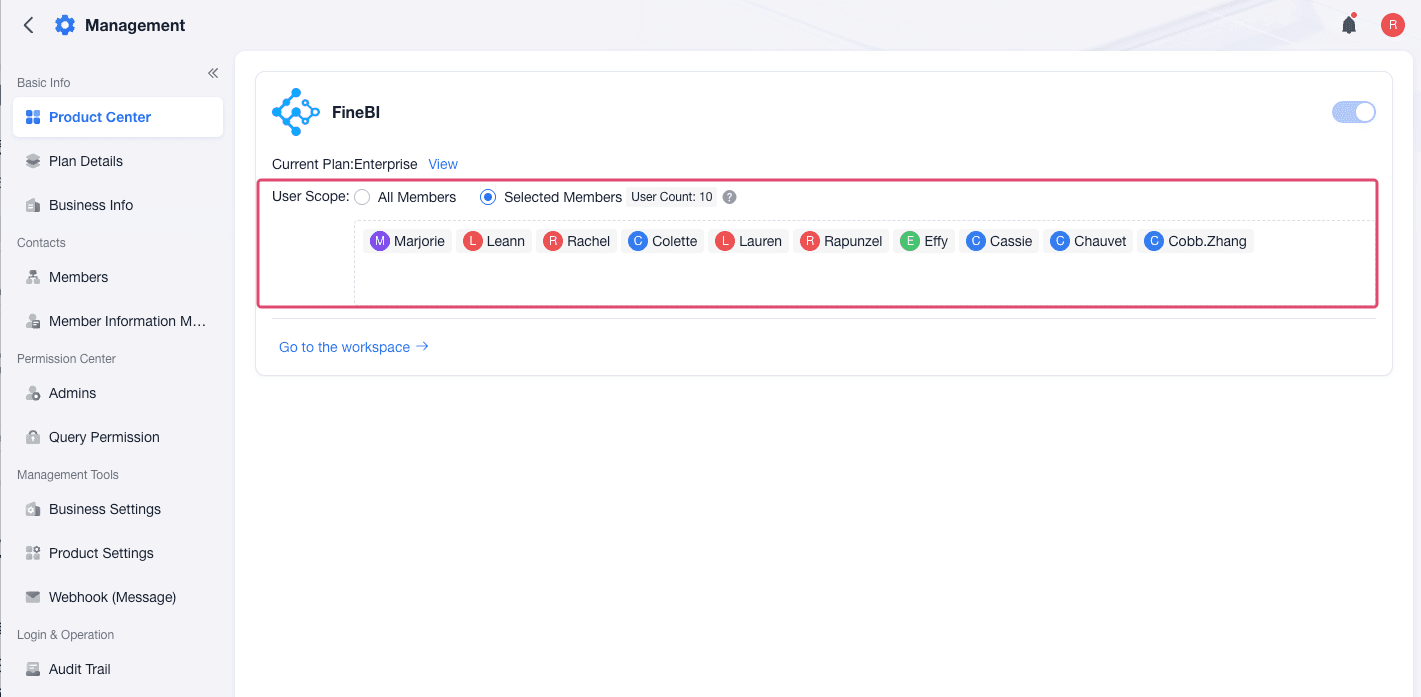
After members are added to the organization, add the members who need FineBI Cloud to the product's user scope in Product Center for them to use FineBI Cloud.
Assign Roles
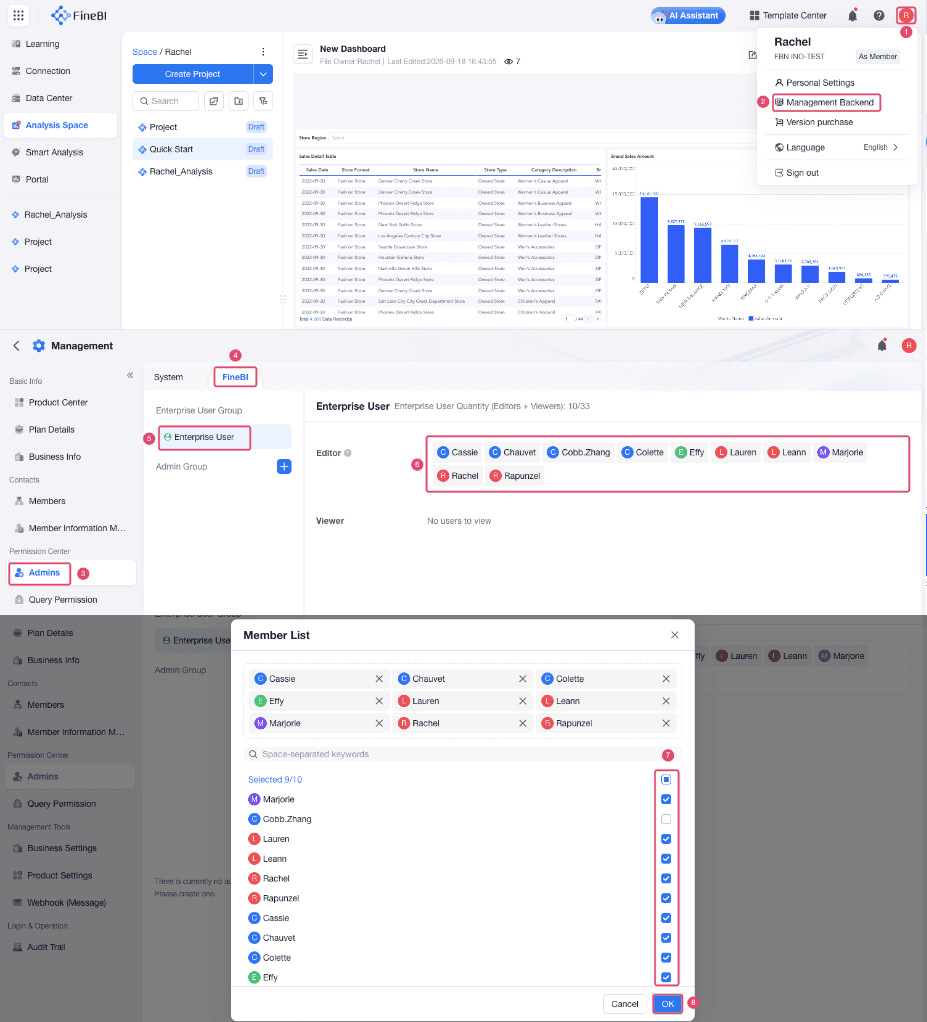
After members are included in the access scope, configure two related settings: user roles and admin permissions.
- User roles define what members can do in FineBI Cloud.
- Admin permissions define who can configure FineBI Cloud in Management Backend.
FineBI Cloud User Roles
| Role | Use It For |
|---|---|
| Editor | Members who create projects, prepare data, build charts, and create dashboards or storyboards. |
| Viewer | Members who only need to view shared or published dashboards, storyboards, and other analysis content. |
Admin Types
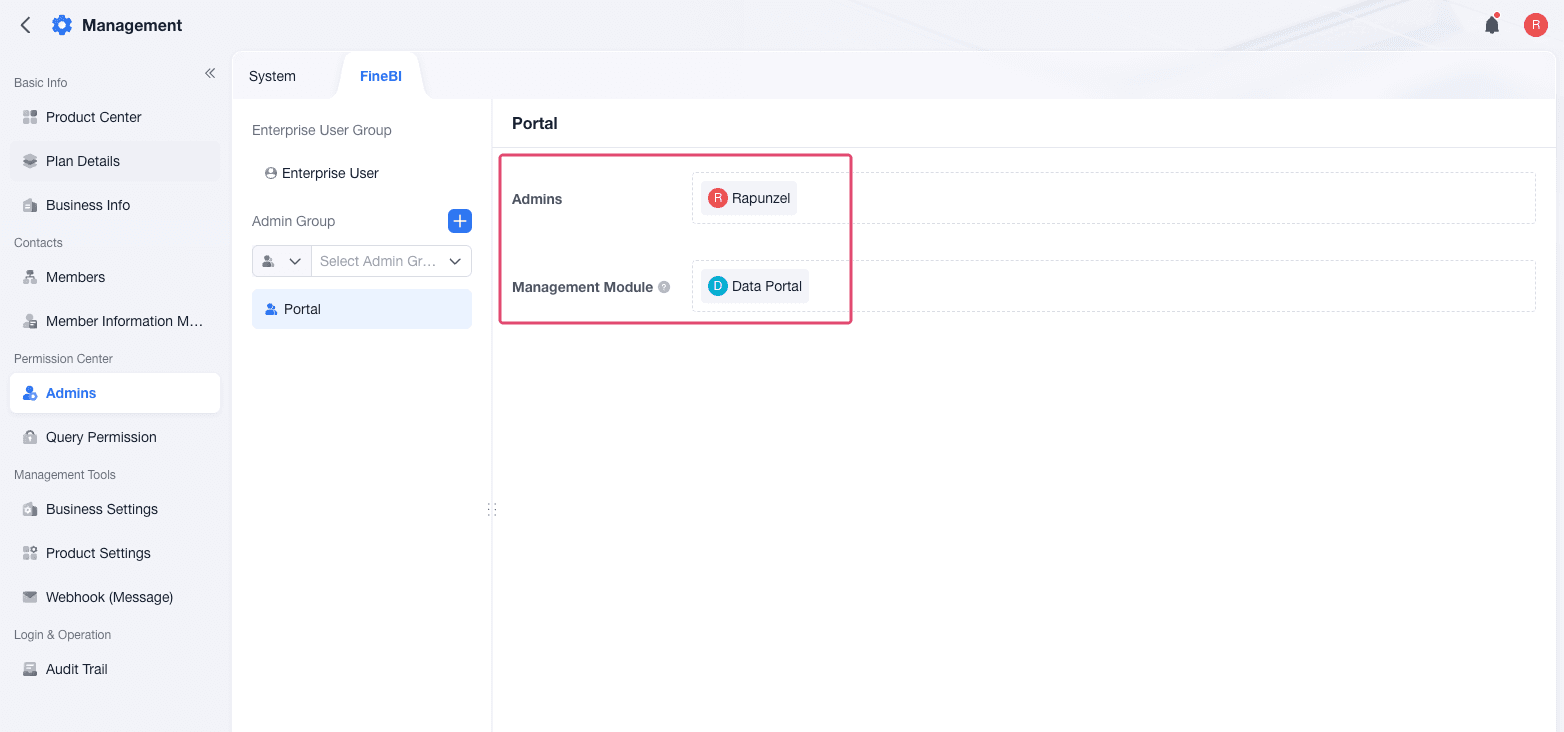
Admin permissions control who can configure FineBI Cloud in Management Backend.
| Admin Type | Scope | Typical Use |
|---|---|---|
| Organization creator | The member who created the organization and has the highest organization-level permissions | Manages the organization, system admins, product access, and major platform settings. |
| System admin | An organization-level admin with full permissions except for closing the organization | Manages members, departments, product access, admin permissions, security settings, and product-level configuration. |
| FineBI Cloud admin | A product-level admin for FineBI Cloud The available operations depend on the permissions assigned to this admin. | Manages selected FineBI Cloud modules, such as User Properties, Security Management, Data Portal, Data Catalog, Data Preparation, and Data Source Management. |
Set Up Spaces and Member Access
Spaces help separate analysis projects by team or department. Depending on your management model, admins can create spaces for teams or allow authorized editors to create and manage spaces themselves. Editors need access to a space before they can create projects in it.
Open Analysis Space. Create a space for the team.
Open Space Management and add the members who need to work in the space.
Configure Data Connection
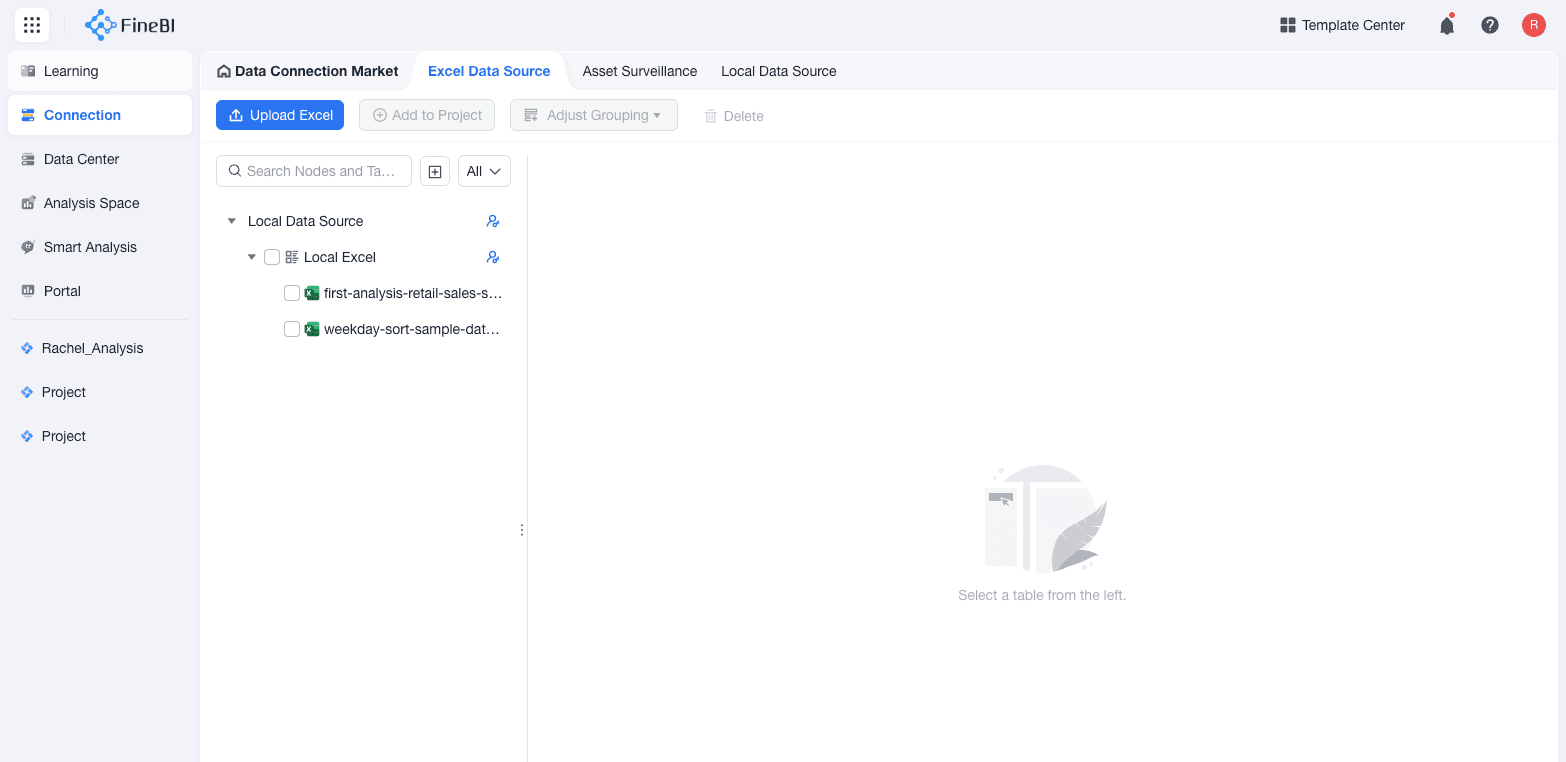
Data connections let editors use data from connected sources in projects. In a business-led model, editors may upload Excel files or connect data sources in their own projects. In an IT-led model, admins typically connect shared data sources and grant members permission to manage, edit, or use them.
Open Data Connection, select the data source type, and complete the connection or upload settings.
Share the data source with the members who need it, and assign the appropriate permission level.
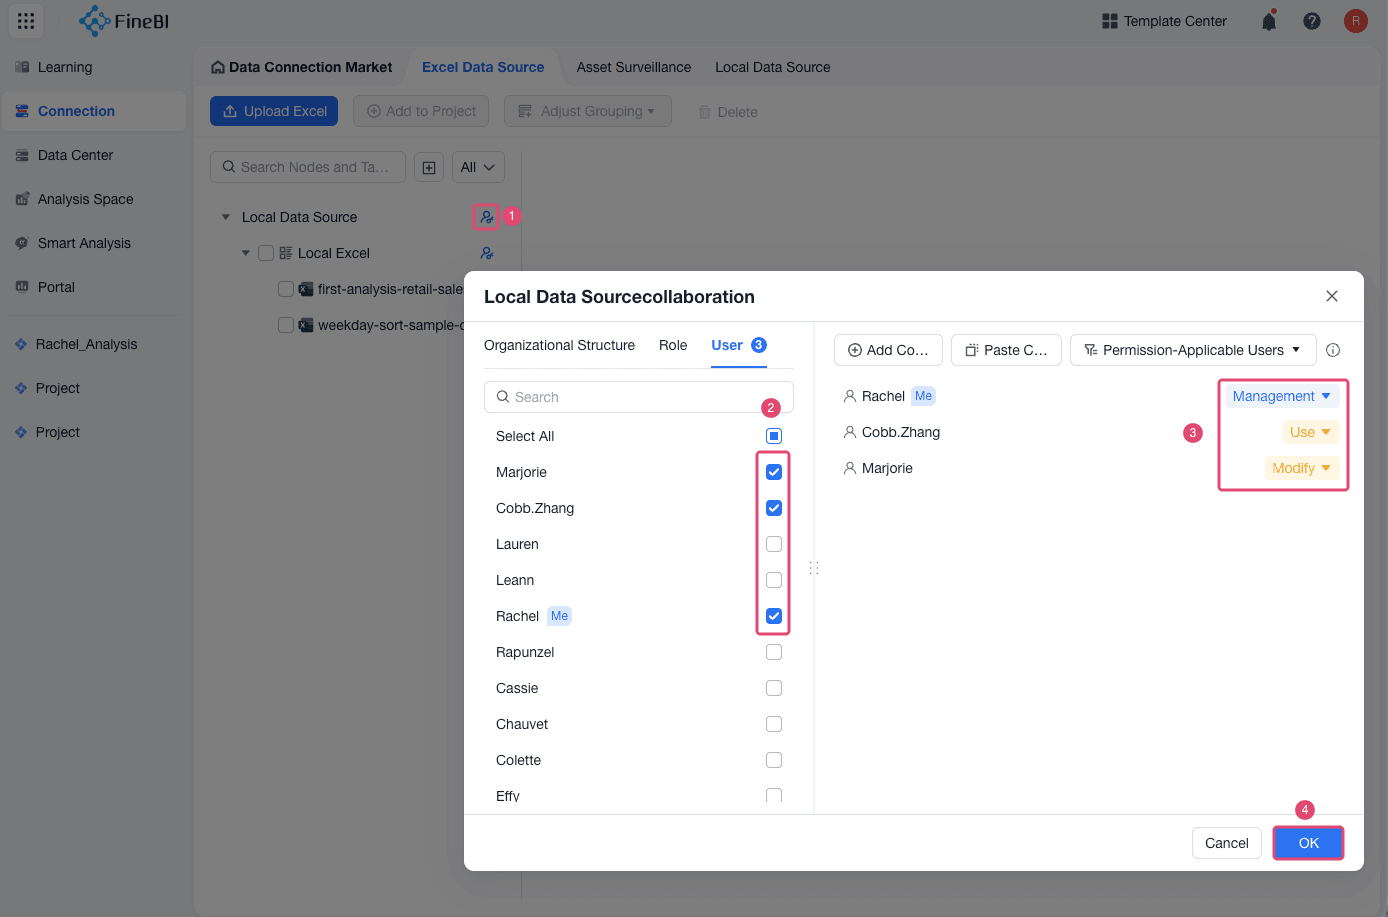
| Permission | What It Allows |
|---|---|
| Management | Manage the data source and share it with other members. |
| Modify | Modify data source settings or related configuration. |
| Use | Use the data source in projects. |
Prepare Shared Data Assets
Use Data Center when your organization needs managed, reusable data assets. Admins can prepare data, define field types, and add prepared tables to Data Catalog so other members can understand and use them.
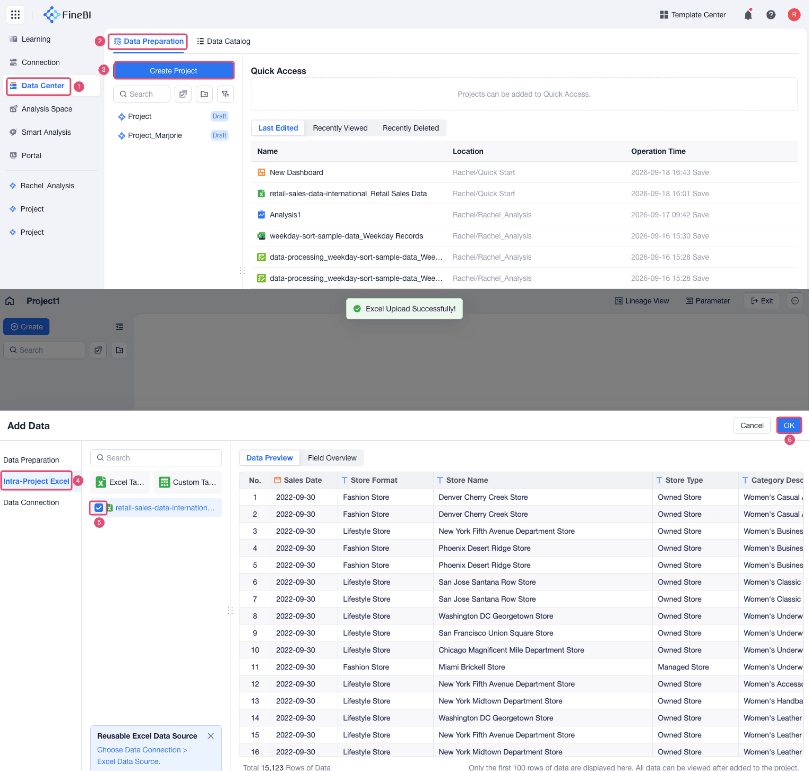
Create a project under Data Center > Data Preparation and add the required source data.
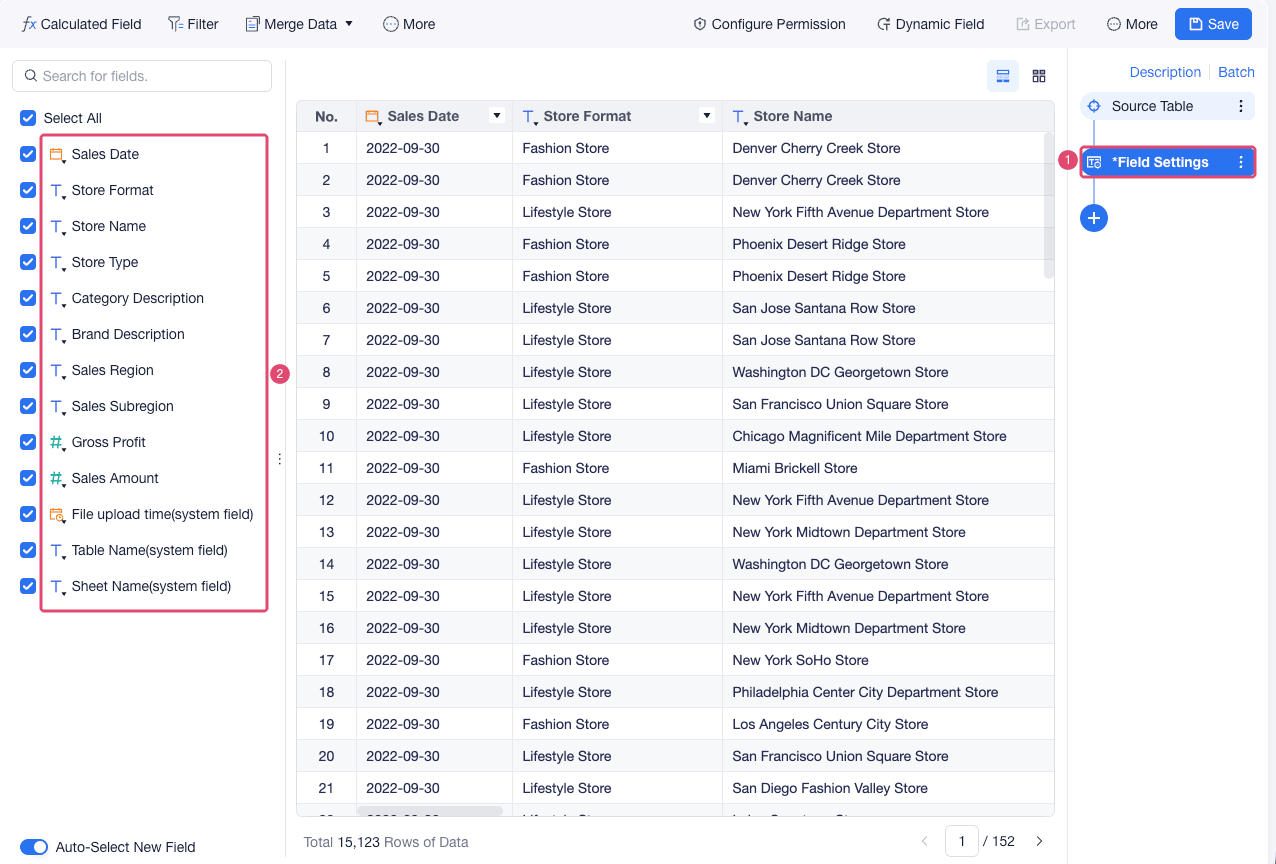
Process the data. For example, adjust field data types so downstream analysis uses the correct data format. Click Save.
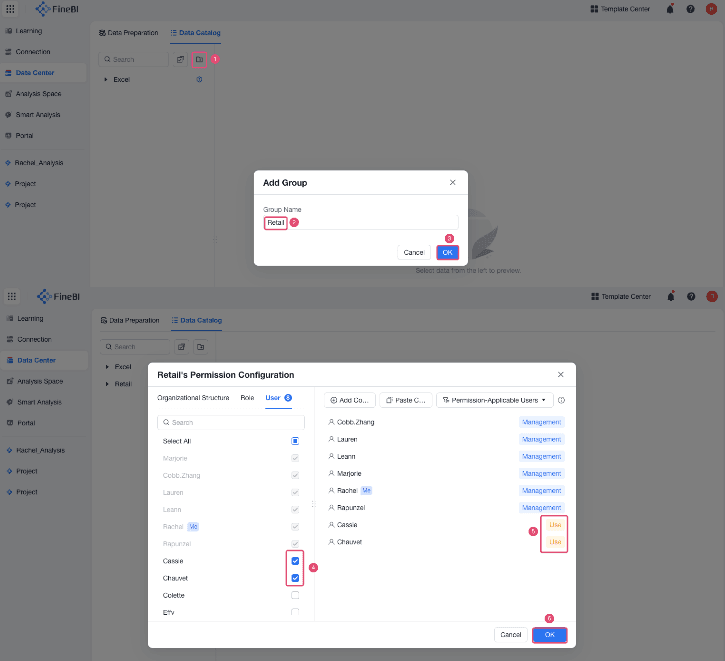
Create a group in Data Catalog and grant access to specific members.
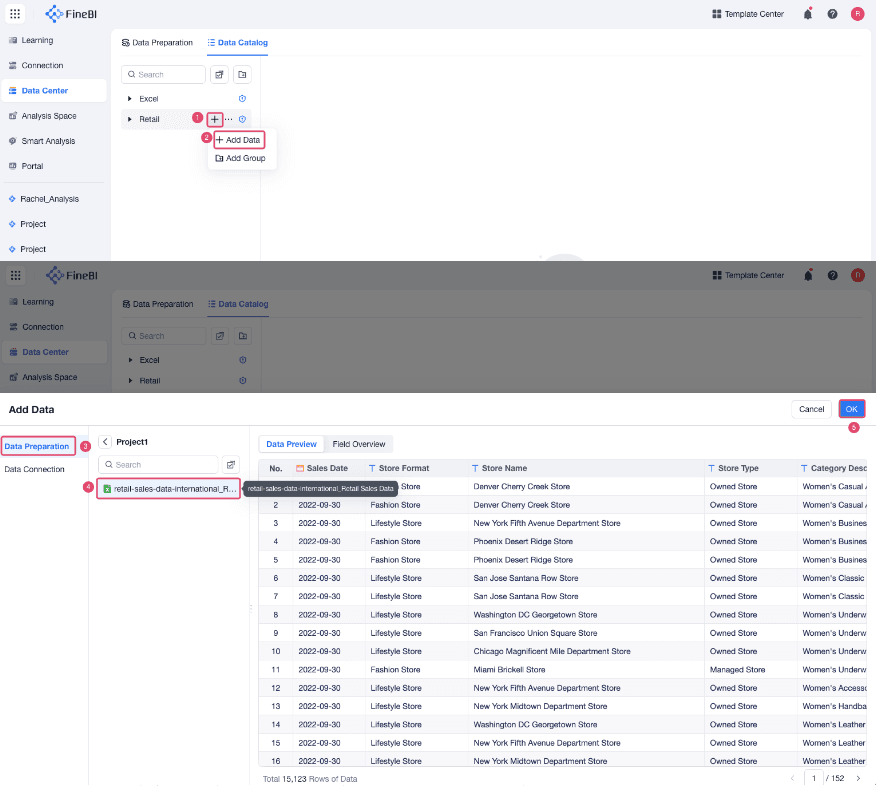
Add the prepared table to the group.
Configure Data Portals
Use Data Portal to provide a centralized entry for viewers to view published dashboards and storyboards. You can publish projects from different spaces to different portals so each audience sees the content they are allowed to view.
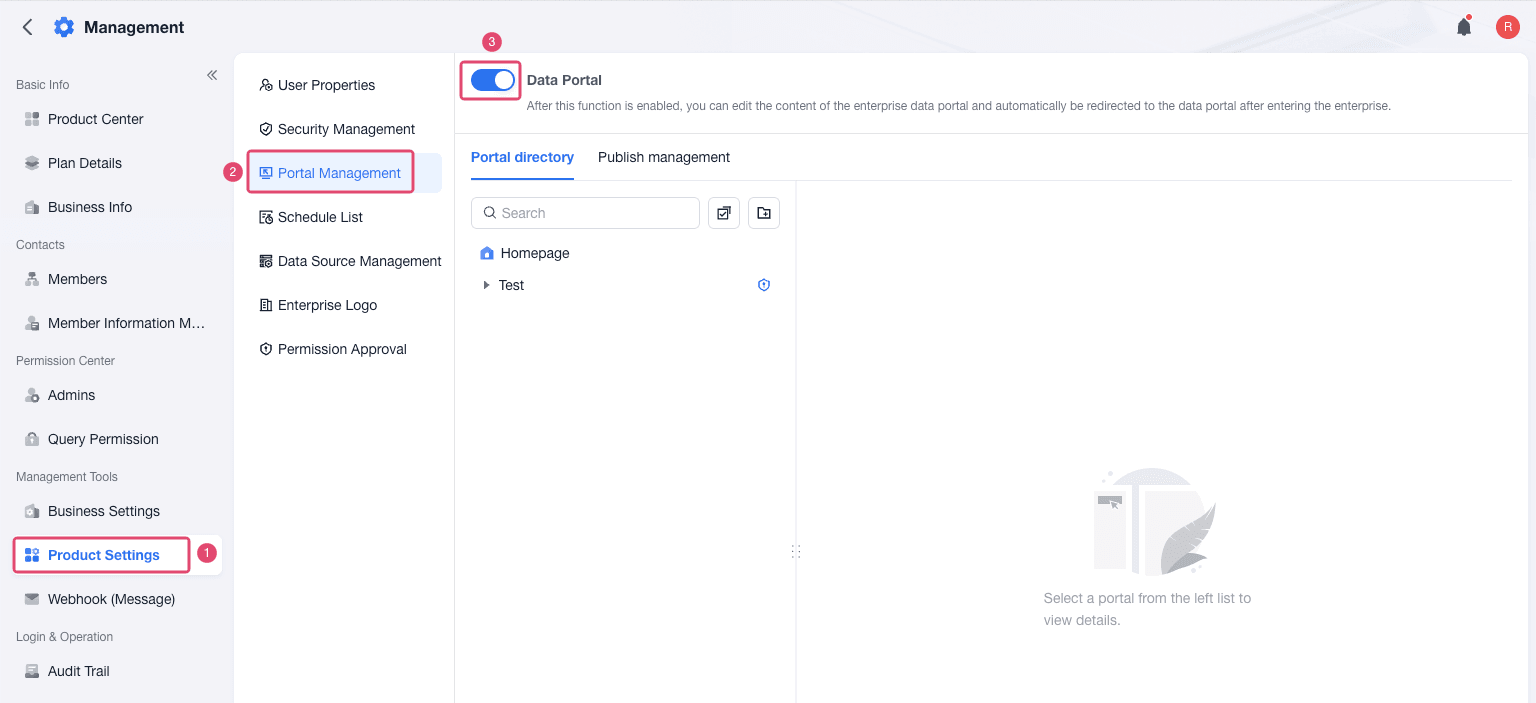
Enable Data Portal under Management Backend > Product Settings > Portal Management.
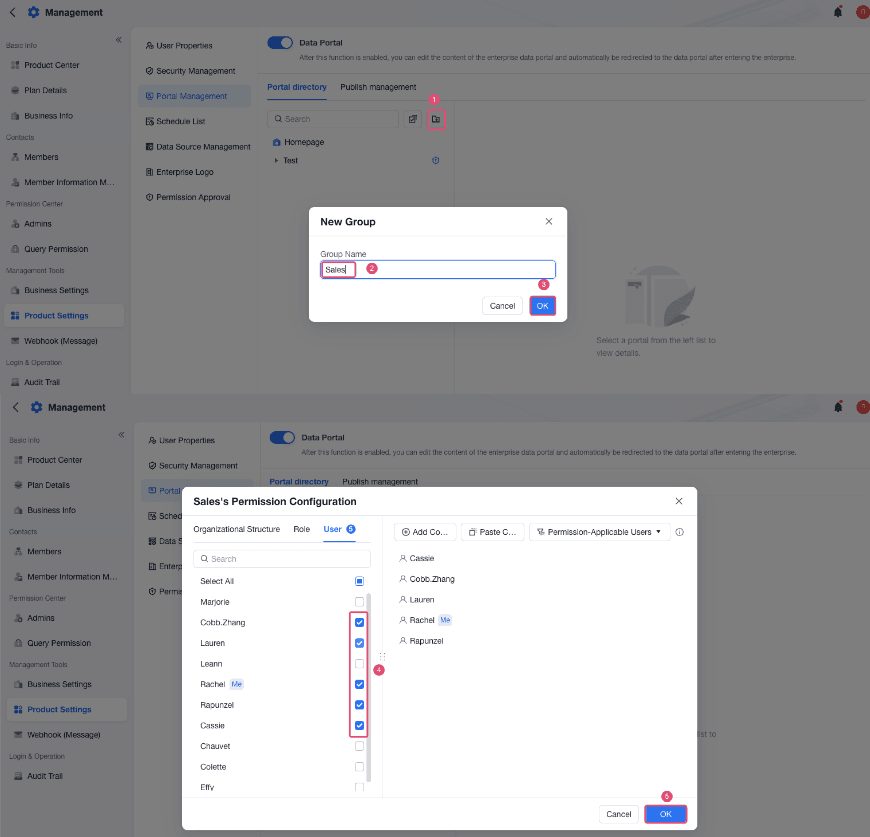
Create a group and grant access to the target members.
Add a project to the portal group, set the portal display name, and select project files to mount. Click OK.
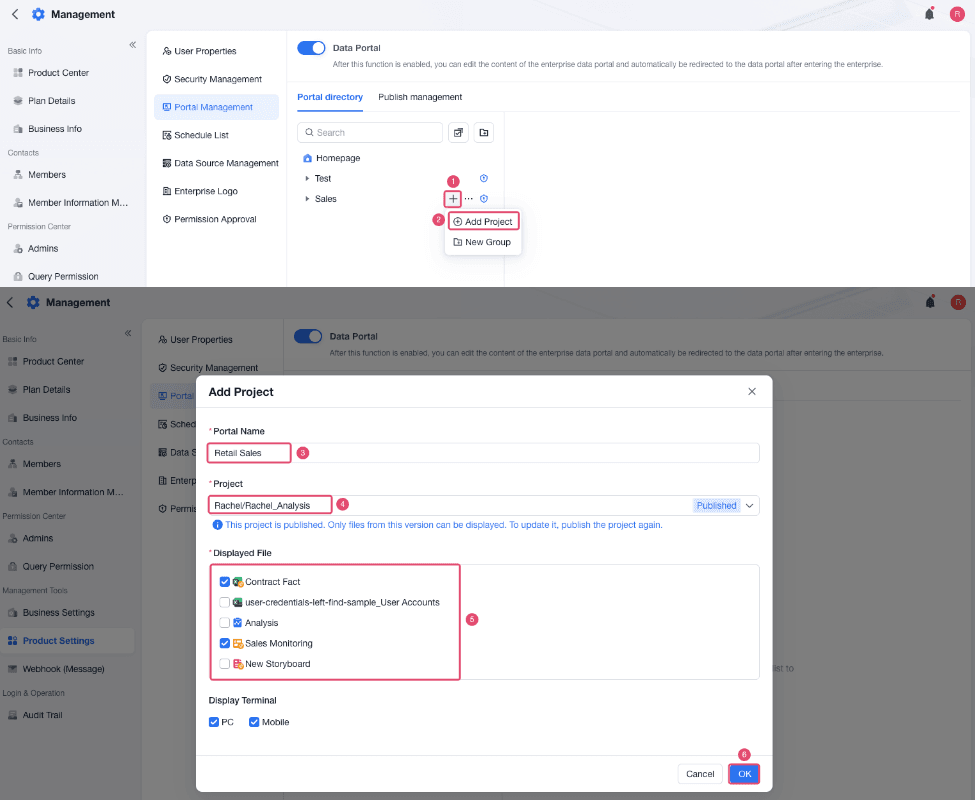
The selected members can view the files in Data Portal after login.
Manage Organization Settings
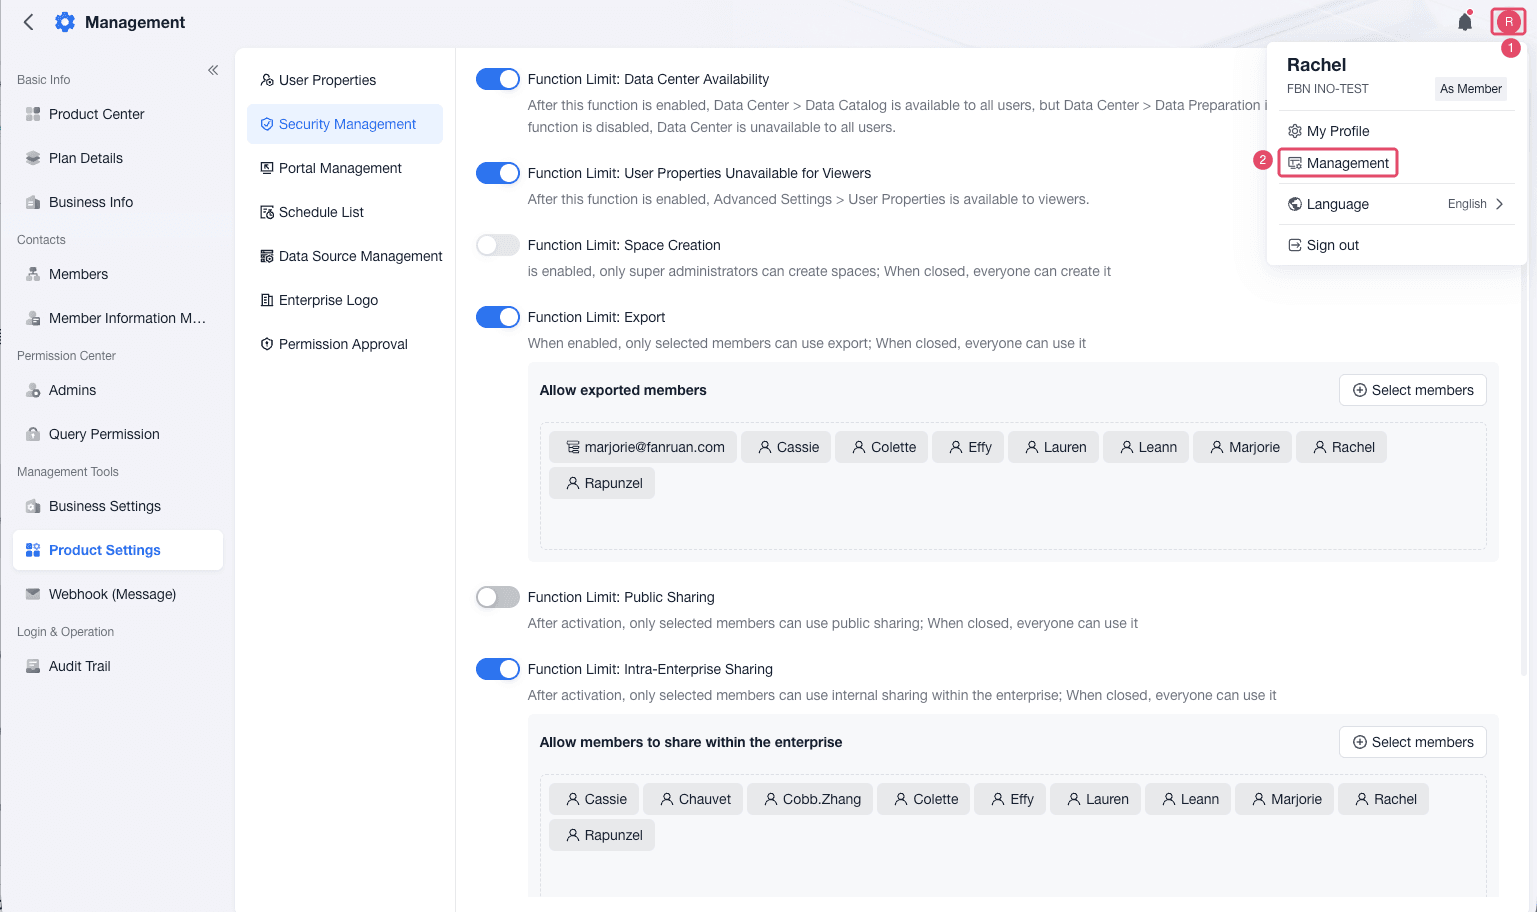
Use Management Backend to manage organization-level configuration and audit information.
| Area | What You Can Manage |
|---|---|
| Product Center | Available products and product user scope |
| Plan Details | Plan information, capacity, and advanced feature usage |
| Business Info | Organization name, account mode, and the organization URL |
| Contacts | Departments, roles, members, and member information |
| Business Settings | Watermark, business style, system language, time zone, and custom sign-in settings when supported |
| Product Settings | Security settings, schedule list, portal management, enterprise logo, and data source management |
| Audit Trail | Login logs and admin operation logs |
Result
After completing the admin setup, members can access FineBI Cloud, editors can work in assigned spaces, shared data sources are ready for analysis, and viewers can open published dashboards or storyboards from Data Portal.